- D/618/7406 Unit 5: Challenges of IT Security in Modern Organizations – Risks, Solutions & Best Practices
- HSC Level 2/3 Unit 012 Assignment: Care Worker Responsibilities and Ways of Working
- CIPD Level 5HR03 Assignment: Understanding Reward Approaches and Their Impact on Performance and Contribution
- CIPD level 5HR02 Assignment: Talent Management and Workforce Planning Unit Guide
- Level 3 D/615/3823 Assignment: Regulation, Protection, and Collaborative Practice in Health and Social Care
- PGM216D Assignment: Bicycle Store Sales Management Application
- MATH6033 Assignment: Epidemiological Investigation of Cardiovascular Health and Tea Consumption Risks
- EH6147 Assingment: Stakeholder Analysis for Quality Improvement in Hand Hygiene Compliance
- Assignment: Investigation of Solution Concentration Through Standard Preparation, Titration, and Colorimetry Techniques
- MATH6033 Assignment: Cardiovascular Risk and Tea Drinking: Epidemiological Analyses
- CIPD level 3 3CO03 Assignment: Core behaviours for people professionals
- DAC4B1: Personal development in adult care settings
- Unit 19 Research Project Assignment 1: Impact of Corporate Social Responsibility on Business Success & Community Wellness
- EG5022 Assignment: Georeferencing and Accuracy Assessment of a Quarry 3D Model Using Photogrammetric GCPs
- Assignment: Financial Performance and Strategic Analysis of a UK Listed Company: A CORE Evaluation and Reflective Review
- 5CNMN002W Assignment: Advanced measurement- Major measurement taking off
- K/650/2298 Level 3 Understanding Roles, Responsibilities, and Effective Partnerships in Health and Social Care
- Understanding Information and Knowledge Management in the Workplace: A Briefing for HR Professionals
- HRM7010D Strategic Use of People Analytics in Enhancing Organisational Value and Agility
- TOWN1060 Urban Planning in the UK History Sustainable Design and Future City Development
Mechanical Engineering – (FEA) finite element analysis on a single machine component, Assignment, OU, UK
| University | The Open University (OU) |
| Subject | Mechanical Engineering - (FEA) finite element analysis on a single machine component |
Introduction
This end-of-module assessment (EMA) is a simulated engineering project for which you will have to carry out a finite element analysis on a single machine component. You will have to demonstrate your learning across the whole module, including the block materials, the ANSYS exercises and the case studies.
Although the component itself should be relatively easy to model, you will find that when it comes to meshing, applying the loads, deciding on boundary conditions, restraints etc., it is anything but simple. As is often the case, there is no ‘right answer’ – you will have to use your new-found analytical skills in making engineering judgements when tackling the analysis. You will also have to write up the project in a comprehensive report so that you can demonstrate these skills.
Remember that in your EMA the examiners are looking for your understanding of the finite element analysis process. You will need to show that you are able to use FEA with safety and confidence, and that you can identify and justify assumptions and decisions made in your modelling, both implicit and explicit.
If you have completed the rest of the module, you should find this final EMA well within your capabilities – demanding, yes, but interesting too we hope.
Make sure you leave yourself enough time for revising and developing your analysis models and to write up the report. Good luck!
Do You Need Assignment of This Question
1 The component to be modelled – a machine shaft
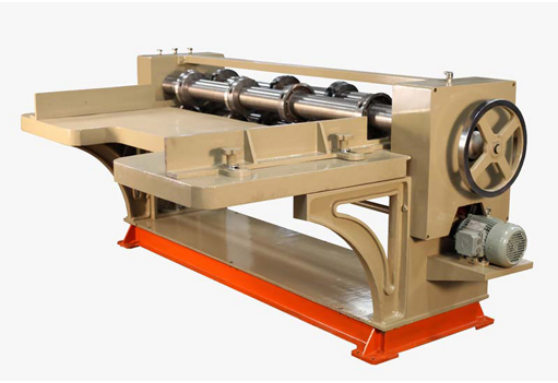
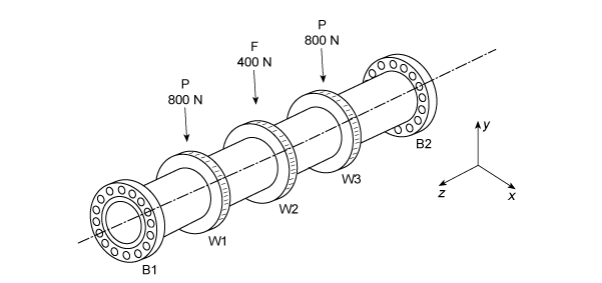
Figure 1 shows a typical roller cutting machine used in the mass production of insulating slab materials. The machine has several rotating parts including a cutting shaft. There are four rotating cutters fixed to the cutting shaft, of which only three cutters are used – see the sketches in Figure 2 for more details.

Figure 1 Roller cutting machine
A similar roller cutter design is to be studied for possible alternative applications in which the cutting loads will be somewhat higher. Hence, finite element analysis is being considered to determine the suitability of the existing shaft under higher loads and, if needed, to redesign it to fit the new purpose.
The cutting shaft has an annular cross section with an outer diameter of 100.0 mm, which cannot be changed, and an initial wall thickness, t, of 3.0 mm. The wall thickness can be changed but only in discrete steps of 1 mm. The shaft material is conventional structural steel, having a yield strength of 250 MPa, a modulus of elasticity, E, of 206 GPa, a density of 7860 kg m and a Poisson’s ratio, ν, of 0.29.
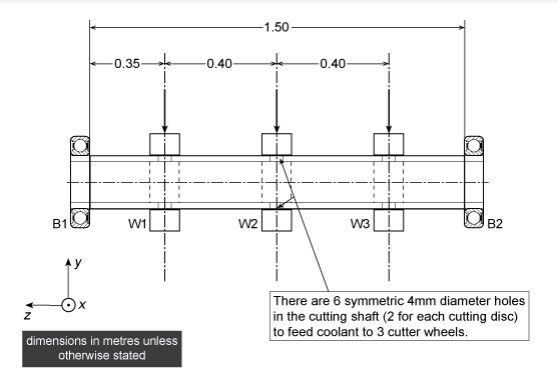
The cutting shaft is located and supported by two roller bearings, B1 and B2, fitted at the ends, as shown in Figure 2. The bearings allow the shaft and cutters assembly to rotate at up to 3000 revolutions per minute about its longitudinal axis, which is parallel to the z direction, but prevent it moving radially (i.e. in the x–y plane).
The shaft is also restrained by circlip type retaining rings (not shown), which prevent it moving in the z direction but with sufficient play longitudinally to allow for any expansion and avoid hindering the rotation in all operating conditions. The bearings can be regarded as having infinite radial stiffness in comparison with the cutting shaft. However, since resistance to bending in the y–z plane (i.e. about an axis parallel to x) is unknown, fully constraint (encastré) and simple support conditions must be considered in both finite element analysis (FEA) modelling and theoretical (hand) calculations.
Buy Answer of This Assessment & Raise Your Grades


Figure 2 Simplified sketches of the cutting shaft (not to scale)
Two bearings (B1 and B2) and the three cutter wheels (W1, W2, W3) are positioned as shown in Figure 2. For this exercise, the cutter wheels themselves can be considered to have zero mass and can be neglected in terms of the effect on modelling the shaft. In the cutting shaft at each wheel position, however, are two holes diametrically opposed and each of 4 mm diameter, which feed coolant from the centre of the shaft to each cutter
2 Stress and modal analyses: limitations, assumptions and objectives
In one loading condition the wheels are to sustain the radial loads shown in Figure 2 for short periods in operation.
These have been ‘factored up’ to represent a worst-case design condition. You are required to perform a stress analysis of the shaft for this loading condition, modifying its thickness (i.e. the only design variable) and re-analysing it as necessary to meet the design limit criteria stated below. For the stress analysis it would be reasonable to neglect the masses of the shaft itself, the wheels and the bearings. It would also be reasonable to neglect the interaction between the cutting wheels and the shaft.
Summary of EMA objectives
1. To determine the deflections and stresses sustained by the shaft in its operating conditions, including the magnitudes and locations of the maximum stress values
. 2. To determine the minimum shaft wall thickness based the results of your analysis and the maximum allowable deflection and stress.
3. To discuss the effect of using a steel with a higher yield strength on the deflection and minimum thickness of the cutting shaft. 25/9/24, 2:32 μ.μ. EMA: View as single page | OU online https://learn2.open.ac.uk/mod/oucontent/view.php?id=2232293&printable=1 5/10
4. To determine the first four normal modes of natural vibration of your chosen shaft in the absence of loadings (i.e. free spinning).
5. To prepare a full report of the analysis strategy, the results and their implications, not exceeding 20 pages including all pictures and tables.
Are You Looking for Answer of This Assignment or Essay
Need assistance with your Mechanical Engineering assignment on FEA (Finite Element Analysis) for a single machine component? Our assignment writing help is perfect for you! We provide expert help with engineering assignments and reliable homework helper online for students. Enjoy affordable, high-quality services that are 100% human-written, ensuring unique content. With our A+ guarantee and on-time delivery, you can count on us to help you succeed!


